Wednesday, March 20, 2013

Free Mini Bunny Pattern

Hello everyone!  Today I have for you a sweet little tutorial on how to make a felt bunny.  I think these would be perfect as Easter gifts, but, as we all know, everyone loves bunnies whether or not it's Easter, so they're really good for any occasion!  I've chosen to attach the bunnies I've made onto a head band, barrette and brooch pin, but you could also make them as teeny little bunny toys to tuck into a pocket or tin, maybe with a little blankie and pillow:)

My lovely niece, Amy, was thrilled to model the bunnies for you, so here she is wearing the head band above, and the barrette and brooch below.  As you can see, she's wearing a T-shirt with one of my embroidery designs that I printed onto iron-on paper.   


The bunny is super easy to make, so you may want to cut out and sew a bunch at the same time.  In fact, it would make a lovely project for you to do together with your little one!  You can download the pattern pieces here.


You'll need:
:  Scraps of felt                                                             :  Embroidery thread
:  Disappearing ink or water soluble ink pen               :  Polyfil
:  Barrettes, brooch pin, head band                              :  Pink coloured pencil or powder blush
:  Embroidery scissors

**  Please click on the photos for better detail.

**  Please be aware that some of you will not be able to download the pattern pieces.  We're not quite sure why that is the case, but if you'd like me to send the pattern pieces via email, please contact me at md1911(at)shaw(dot)ca, and I'd be happy to send them over for you:)


Cut out pattern pieces, lay onto chosen felts and cut out using a small, sharp pair of embroidery scissors.  Arrange your felt pieces onto your work area as I have them in the photo above (right sides facing you).  Draw a little eye onto each head as shown with your water soluble or disappearing ink pen.


Applique each inner ear onto the attached ear on each bunny.


Flip bunnies over (wrong sides facing you) and lay each single ear onto each attached ear, aligning the tops and sides of the ears.  You'll notice that the bottom of each single ear is a little longer than the attached ear - that will ensure that when you sew the sides of the bunny together, the little tabs will be tucked in between the two layers.


Whip stitch each single ear onto each attached ear.


Flip bunnies over once again, so that the right sides are facing you.  Embroider the outline of the eyes with black embroidery thread and fill in using satin stitch.  Stitch a tiny dot of white embroidery thread onto the eye to give the illusion of light reflecting off the eye.


Place sides of bunny together, wrong sides facing.  Starting at the curve of the back of the neck, whip stitch around till you get to the ears.  Back stitch through all layers of felt along the base of the ears and then continue whip stitching once you get to the other side of the head.  Continue whip stitching around to the start of the bunny's tummy.  Stuff head and neck with polyfil.  I like to use an orange stick to gently push the stuffing into place.


Continue whip stitching around to the other side of the bunny's tale.  Gently stuff legs and body and continue whip stitching to close the seam.  Leave a length of thread for attaching the bow and also for attaching the bunny to either the head band, barrette or brooch pin.  Smudge a little colour onto the bunny's cheeks to give them a rosy glow.


Position the bow in the centre of the neck and stitch the centre of the bow in place.  Take your length of thread through to the back of the bunny as you'll be using it to attach the head band, barrette or brooch pin next.


Pin bunny onto head band/barrette/brooch pin and sew on securely.


I hope you enjoy making these little buns and I'd love to see pics of them!  You can post them on my Facebook page:  https://www.facebook.com/gingermelondolls?ref=hl, as well as on the Gingermelon group page on Flickr:  http://www.flickr.com/groups/2124571@N25/.


Oh, and by the way, I'm happy to announce that you can now purchase the gorgeous Merino wool blend felt, as well as the safety eyes that I use to make many of my creations, in my shop! 


There are 60 luscious colours to choose from, and you will absolutely love working with this soft, vibrant, high quality wool blend felt!  Below is a swatch card with all the colours I've chosen for my shop.
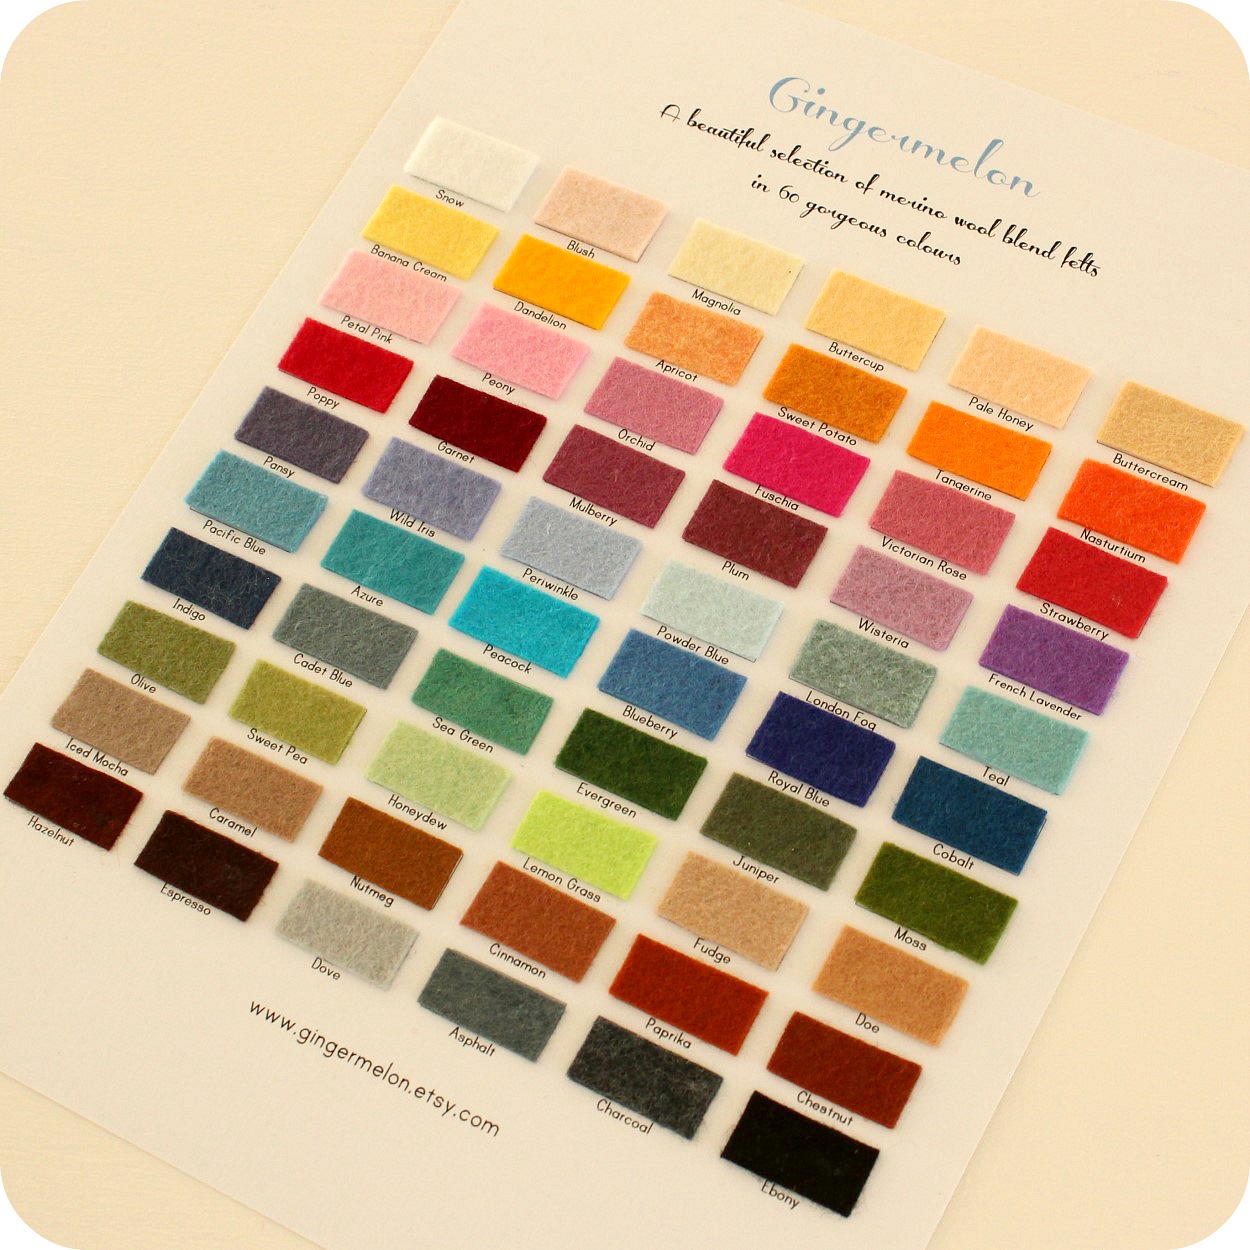

Happy sewing everyone!
~Shelly

Wednesday, March 13, 2013

A Spring Announcement!!

Hi everyone!  For many of us, Spring break and Easter are just around the corner!  It's so lovely to see the cherry blossoms blooming and the daffodils and tulips poking their pretty heads out!  Spring is definitely my favourite season as it's usually a time of renewal and transformation.  Having said that, I thought I'd share some exciting news with you all!  And no, I'm not pregnant!  I'm very pleased to announce that very soon, I'll be offering the beautiful wool blend felt that I use to make most of my dolls and animals, in my etsy shop.  I've thought about doing this for quite some time and now is the perfect time to do so!  Will keep you posted as to when everything will be ready!! 

For Easter this year, I've designed a sweet little Easter Bunny and Chick pattern that I think would be a perfect project to make with a child during Spring break!  These little darlings are very quick and easy to whip up and would look so adorable in a pretty basket filled with chocolate goodies!


Each bunny measures about 5 inches tall and the teeny chick stands about 2 inches tall.


The pattern for these little ones is now ready and available in all my shops:)
~Shelly xo

Friday, March 8, 2013

New Collection of Paper Dolls

Well it seems that this has been the worst week for taking decent photos ever!  I can't begin to tell you how many times I have tried to get good shots of my new collection of Paper Dolls!  Is it me, my camera or just the incredibly gloomy weather we've been having lately??  I don't know, but thankfully, I woke up to a perfectly sunny morning today, and have been snapping pics all day!

 I've made a collection of five different dolls, including a little mermaid that has the option of wearing her tail or pair of legs.  The collection can either be purchased as a set of five colour-your-own dolls, or, for those who prefer them coloured already, they're also available in pairs - one doll with two different colour options.  They're available as downloadable pdf prints and can be printed over and over again!  These are perfect for keeping children occupied on rainy days or when they're feeling crafty:)

Coral and Peach

Juniper and Clover

Lavender and Cinnamon

Vanilla and Ivory

Sky and Iris

Here's a few other things I've been doing lately:

  Made a few dresses from gorgeous Liberty of London fabric for Blythe.

For this little one, I tried a new way of doing her head, which I quite liked.  Usually my cloth dolls' heads and bodies are made in one piece and this version separates the head and body which I will do from now on.  Her hair is made from wefted mohair.


And this little one is slightly larger than the one above which meant that she was much easier to sew! My dear mom made the teeny cardigan for her:)

Hope you've all been well and staying clear of the flu!  I managed to pick up a nasty bug which lingered for almost five weeks, but I'm finally feeling better now and ready for more doll making!!

Have a wonderful weekend,
~Shelly xo

Monday, February 18, 2013

Pincushion Winners!

Many thanks to those of you who entered the Pincushion Cottage giveaway, your lovely comments are very much appreciated!  The winners names have been drawn and I've notified each via email - a big CONGRATS to Marie and Lisa Jo H!! 
 Have a great week everyone!
~Shelly xo


Saturday, February 16, 2013

Pincushion Cottage Giveaway!!

Hello to you all!  I thought it was about time to have another giveaway and the best part is, is that there's not one, but two goodies up for grabs!  These little pincushion cottages are hand embroidered and made out of wool blend felt.  I've stuffed them with a mixture of polyfil, basmati rice and fragrant dried lavender and they each measure about 3 x 3 inches.


If you'd like to enter, please leave a comment below with your name, email address and which house you'd like to win - white or yellow.  The draw will be held on Monday, Feb 18th and I'll email both winners to find out their addresses for shipping.

 For those of you who would like to make your own pincushion cottage, the pattern is now ready and available in my shop.


Best of luck to you all!
~Shelly xo

Thursday, February 7, 2013

Free Paper Doll Download and the Mini Moppets

If you love paper dolls as much as I do, I have a little surprise for you! 
 Three colour-your-own, articulated paper dolls for you to download!  These girls print up quite big - in fact, they measure about 12 inches tall once assembled.  You'll need some heavier paper (card stock), mini brads and whatever you or your little ones like to colour in with.  I used a combination of coloured pencils, pan pastels and good old wax crayons to embellish mine, but you can get out your poster paints, water colours, felt markers, etc...
 As you can see, my table is covered with q-tips, sponges, coloured pencils and my newest favourite things - pan pastels - which are so nice to use!  One tip if you are working with pastels, cover the area you've already coloured with a clean piece of paper so that you don't smear your work.  Trust me, I know!  If you can find a pastel fixative, even better!  This allows you to work on an area, spray it with the fixative, allow to dry for a few moments and then move to the next area without worrying about smudges.  Pastels are so pretty, but the chalky dust can ruin a carefully coloured picture within seconds!
Here's a comparison shot of the size difference between my regular paper doll, on the right, and the new one, on the left.  
To download these dolls, please click each name:  Paperdoll Penelope, Paperdoll Prudence and Paperdoll Rowan.

Before I go, I just want to share three other dolls with you.  Most of you have seen them, but for those who haven't, here are the Mini Moppets.
These little dolls are teensy and measure about 5 inches tall.  I used a flat tooth pick to stuff their arms and legs!  Each wears a pretty little dress made from a light weight cotton, which ties above the shoulders, and their hair has been needle felted onto their heads.  The pattern for them is now available in my shop.

Please excuse the nudie pic, but here's a look at how tiny she is!
After her hair treatment:)
All dressed!


I hope you have lots of fun colouring and assembling the paper dolls!  Oh, and one more thing, I've created a group page on flickr where you can share all your Gingermelon creations.  Please pop over and take a peek at all the wonderful photos and I'd love it if you could add your own:  http://www.flickr.com/groups/2124571@N25/

Have a happy week:)
~Shelly  xo


Sunday, January 20, 2013

Embroideries

Hi everyone!  My mind is all a-buzz with new ideas for the coming year!  I'm hoping to add quite a few new projects to my shop and one of them is embroidered patterns.  Most of you who've visited my Facebook page and Flickr have had a peek at what I've been working on for the last couple of weeks and I'm very excited to say that the pdf patterns for the first three little girls are now ready and will be available in my shop later on this afternoon!  These are just the beginning of many more to come and I hope you like how they've turned out!  Each one has been coloured in with coloured pencils - I think that was my favourite part!


I like the idea of displaying them on a wall in their embroidery hoops, but you could transfer the patterns onto a little dress or an apron, tote bag etc... Each will be sold separately, or for those who'd like them all, I'll have the option of the entire set.


For the fairy, I used metallic silver thread to outline her wings and tiny seed beads for her buttons.


This little one is my favourite of all!  Love the little flowers!


And this one would look so sweet on an apron!


Of course, there's a bonus to these little embroidery designs!  Why not print out some for the kids to colour while you're embroidering them!


I can never resist a good colouring-in session!

Enjoy your week!
~Shelly  xo

Tuesday, January 8, 2013

Pattern Winners

Hello everyone!  Many thanks to those of you who entered my latest pattern giveaway!  Your lovely comments are very much appreciated!  I used the random number generator to pick the winners and they are as follows:
Jeannie Gan
Lea - Craftynanny
Nelda Hart
April Doran
Charity Smith
Congratulations ladies!  I've sent the pattern over to each of you via email and can only say that I hope you enjoy making them as much as I did!


This pattern is now available in my shop for those of you who'd like to give it a try :)
Have a wonderful week,
~Shelly xo

PS.  I was very happy to read that many of you would enjoy seeing more embroidery patterns, so I'll keep you posted on what I have planned for the next one :)

Saturday, January 5, 2013

Pattern Giveaway and a Free Embroidery Tutorial

Happy New Year everyone!  To start this brand new year, I have two surprises for you!  The first is a Pattern Giveaway and the second is a free Embroidered Fox Lavender Sachet tutorial!  Yay!
Many of you have already seen my two new creations ~ a Panda and a Princess Kitten, each with a little cupcake to celebrate their birthdays.  I think these would be lovely as birthday cake toppers, but of course, that's up to you to decide what you'll make them for:)


This pattern will include instructions and pattern pieces to make both animals and their accessories.  I love the idea of a versatile pattern with options to change things up a bit.  You could make either one as a boy or a girl just by changing their ears and accessories.  Each ones measures about 6 inches tall from tips of ears to tops of toes.


I made the kitty with hand dyed wool felt from Feltorama, and the panda and all the accessories were made with a wool blend felt from Benzie Bazaar.  I used 7.5mm safety eyes that I purchased from 6060.  To make kitty's crown and star, I 'painted' all~purpose glue on each and sprinkled tinsel glitter on top.  Her wand was made with a jewelry head pin, onto which I threaded seed beads.  Her little cupcake has three layers of frosting sprinkled with seed beads, and is trimmed with elasticized lace and seam binding.


Panda wears a birthday hat with seed beads and a tiny pom~pom.  His little cupcake is topped off with a pretty red rose and a wrapper to match his accessories.


If you'd like to enter to win this new pattern, please leave your name and email address in the comments section below and I'll pick five winners on Tuesday, January the 8th.  If you are unable to leave a comment here, please see the post on my Facebook or Facebook Fan Page and leave your comment at either one.

Now, on to the free Embroidered Fox Lavender Sachet tutorial!  A little while ago, my dear friend Jessica Hamilton of The Doll Project asked me to create a special project for her blog readers as well as mine.  I put a lot of thought into what to create and finally decided to try something completely new.  I've been considering the idea of creating embroidery patterns and thought that this free tutorial would be a good way to start.  You can download the free pattern by visiting Jessica's site.


This little sachet is very easy to make and requires very basic embroidery skills.  I've included an illustrated stitch guide as well as the materials you'll need to make it.  Unfortunately, the photo's I took during the making process turned out so badly due to our gloomy weather, that I was unable to include them in the tutorial.  Do not be alarmed if you are used to my step-by-step illustrations as it really is very easy to make, you'll see!


I used a mixture of fragrant dried lavender and uncooked Basmati rice to fill the sachet and I must say that it smells divine!  You could tuck it into a lingerie drawer, hang it from a closet door or make it for someone special, if you can bear to part with it!


Please remember to leave your name for the Pattern Giveaway and I'd love to hear your thoughts on the embroidery tutorial!  If this is something that you'd enjoy making, I'd love to start adding embroidered patterns to my shops!

All the best for a very happy, healthy and creative New Year!
~Shelly xo

Saturday, December 8, 2012

12 Days of Gifts Special!!

Season's Greetings dear friends!!  

Just wanted to let you all know that I'm offering a 12 Days Of Gifts Special in my Etsy Shop! Each morning I'll post an announcement on my facebook page with the Gift of the Day ~ a different pattern or pattern set will on sale for 50% off the regular price!!  


So, if there's a particular pattern you've had your eye on, please be sure to check in as this special will only be on for a limited time!

Have a happy weekend:)
~Shelly xo

●✿Free Pattern - Owl Ornament✿●

Hello there!  It's been so long since my last post that I actually couldn't figure out how to get into my Blogger account!  It's...